Windows 10 には、エクスペリエンスを向上させる便利な設定が満載されていますが、多くの機能は設定やコントロール パネルからアクセスできません。
Windows レジストリ エディターを使用すると、Windows 10 の隠し機能を有効にして、詳細情報を提供するだけでなく、Windows 10 でのエクスペリエンスを向上させることができます。
レジストリ エディタは強力なツールであり、変更を行う前にレジストリのバックアップを作成することをお勧めします。
これにより、レジストリ エントリを誤って編集または削除した場合に、バックアップを復元してシステムを回復できます。
以下は、Windows 10を使用してエクスペリエンスを強化するために知っておくべき強調表示されたレジストリハックです。
Windows 検索で検索を無効にするBing
Windows Search には、検索エンジンの統合Bingが付属しており、ローカル検索で何も見つからない場合にBingのコンテンツを検索できます。プライバシーやパフォーマンスの問題でBingが好きではない場合や、問題が発生している場合は、レジストリを使用して無効にすることができます。
Windows 10 でBing検索を無効にするには、次の手順に従ってください。
- Windows 検索を開きます。
- レジストリ エディタを検索し、クリックして開きます。
- Windows で、エディタの起動の許可を求める UAC が表示されたら、[はい]ボタンを押して続行します。
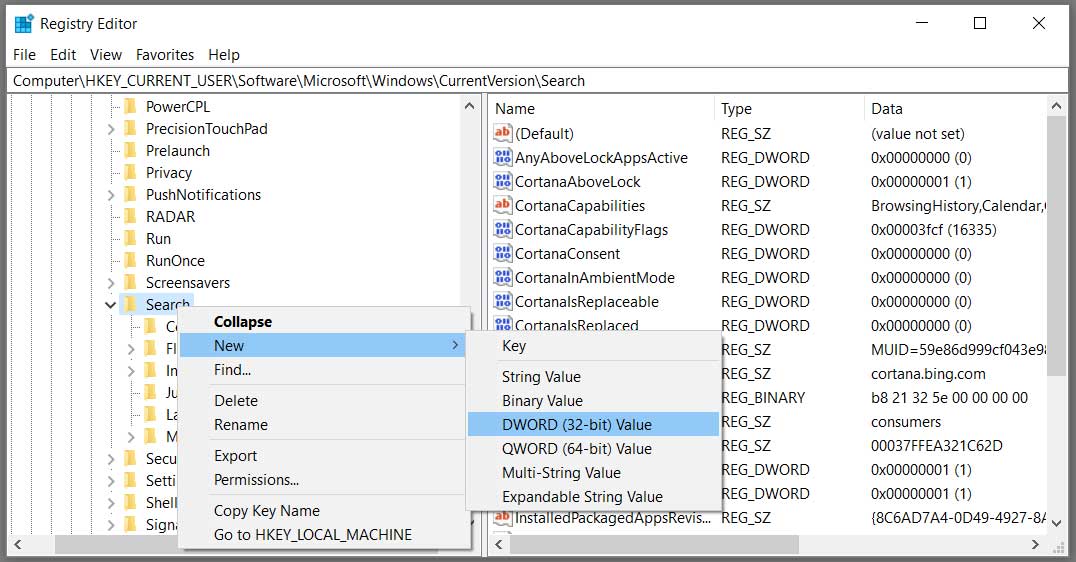
- レジストリ エディターで、 HKEY_CURRENT_USER\ソフトウェア\マイクロソフト\Windows\現在のバージョン\検索 キーに移動します。
- 次に示すように、 検索 を選択します。
- 新しい値を作成するには、BingSearchEnabled と入力します。
- ダブルクリック ビングサーチ有効化 値を 0 に設定し、OK ボタンを押します。
- 同じ場所で、コルタナ同意を見つけます。
- それをダブルクリックし、値を 0 に変更し、ボタンを押します。
- レジストリ エディタを閉じて、エクスプローラを再起動するか、Windows 10 を再起動します。
無効にする ウィンドウズ10ロックスクリーン
タッチ対応ディスプレイがない場合、Windows 10 のロック画面機能は不要になる可能性があります。Windows 10 では、ロック画面の操作性を向上させるために変更できる設定がいくつかありますが、レジストリを編集して削除することもできます。Windows 10 のロック画面を無効にするには、次の手順を実行します。
- Windows 検索を開きます。
- レジストリ エディタを検索し、クリックして開きます。
- Windows で、エディタの起動の許可を求める UAC が表示されたら、[はい]ボタンを押して続行します。
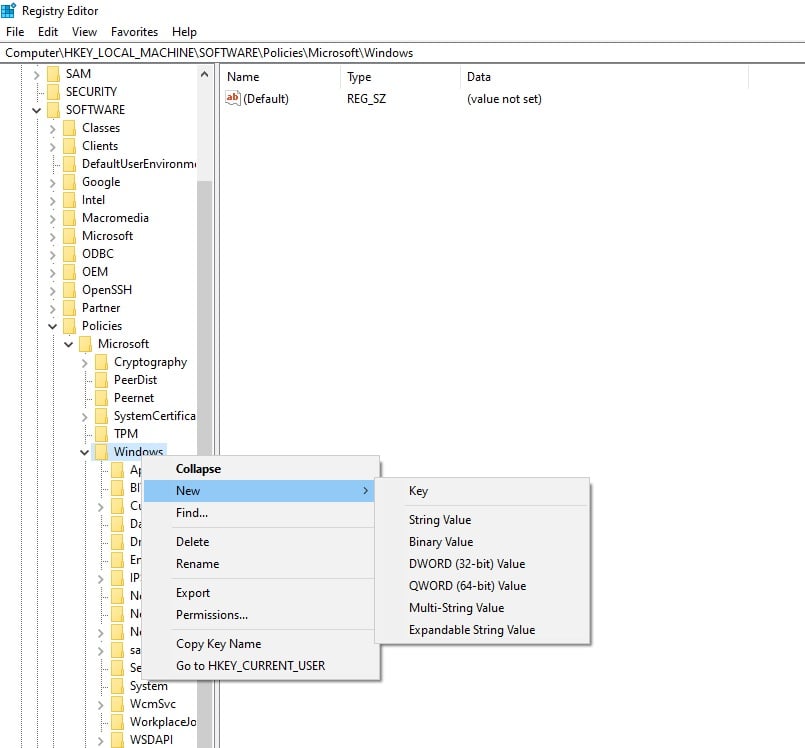
- レジストリで、[HKEY_LOCAL_MACHINE] をダブルクリックします。
- \ソフトウェア\ポリシー\マイクロソフト\ウィンドウに移動します
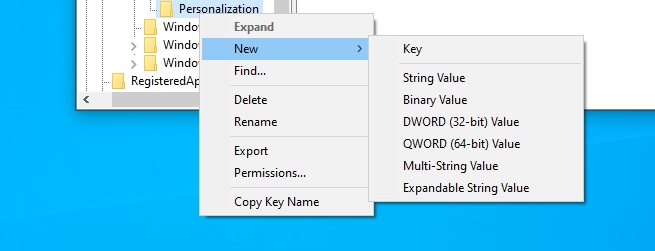
- Windows フォルダの下に、"個人用設定" というキーを作成します。
- 作成した新しい個人用設定キーを右クリックします。
- 新規の選択 |DWORD (32 ビット) 値。
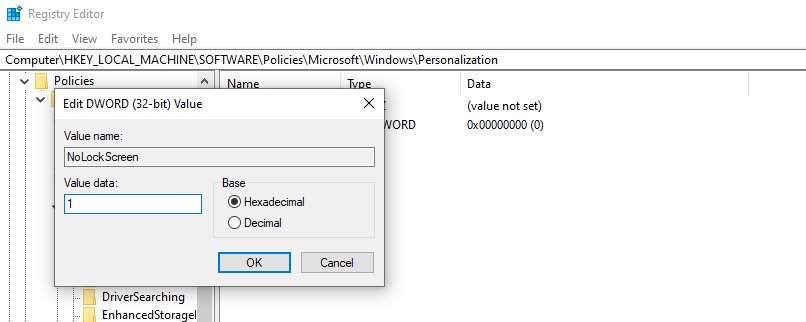
- 名前として「NoLockScreen」と入力します。
- エントリをダブルクリックし、値を 1 に変更します。
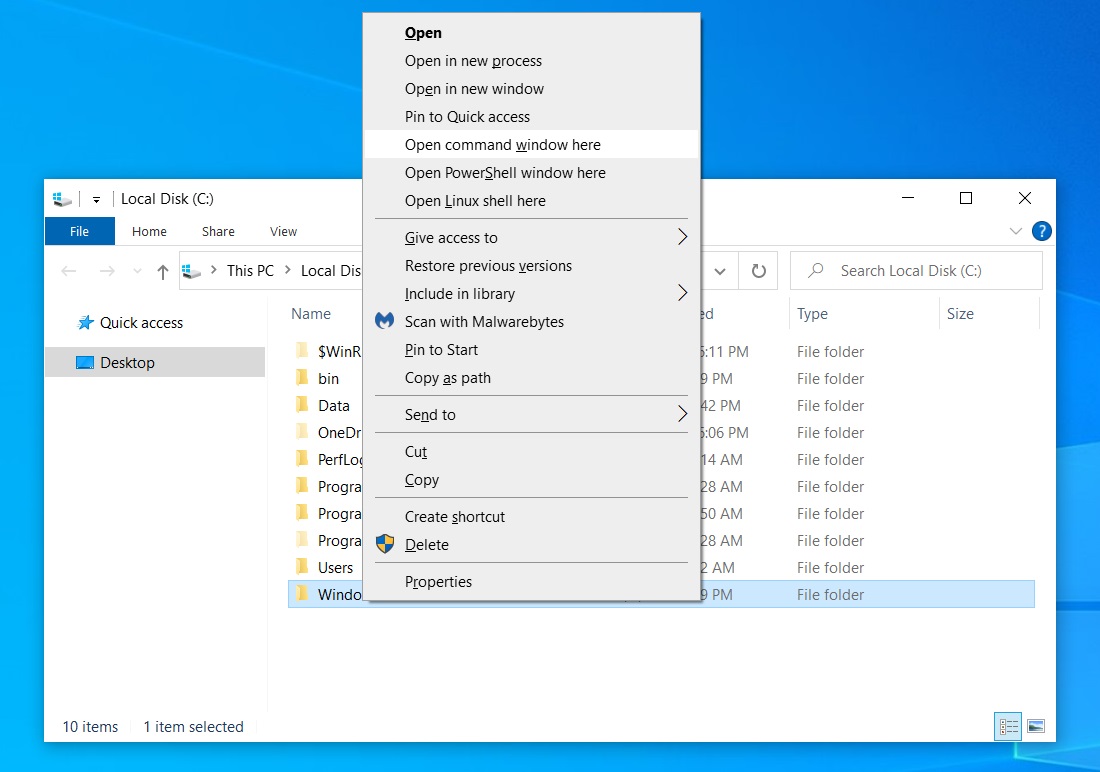
ファイル エクスプローラのコンテキスト メニューに [ここで開くコマンド ウィンドウ] を追加します。
レジストリを調整することで、 コンテキストメニューオプションを復元してコマンドプロンプトウィンドウを開き、次に示すように特定のフォルダで自動的に開くことができます。コンテキスト メニューに [コマンド ウィンドウを開く] を追加するには、次の手順を実行します。
- Windows 検索を開きます。
- レジストリ エディタを検索し、クリックして開きます。
- Windows で、エディタの起動の許可を求める UAC が表示されたら、[はい]ボタンを押して続行します。
- HKEY_CLASSES_ROOT\ディレクトリ\背景\シェル\cmd に移動します。
- cmd (フォルダ) キーを右クリックします。
- [アクセス許可] をクリックし、[詳細設定] ボタンをクリックします。
- [セキュリティの詳細設定] で、[信頼されたインストーラ] 所有者の横にある [変更] リンクを選択します。
- 指定したフィールドにアカウント名を入力します。
- [名前の確認] をクリックして、アカウント名を確認します。
- [OK] をクリックします。
- サブコンテナとオブジェクトの所有者を置き換える オプションを確認します。
- [適用]ボタンをクリックし、[OK]をクリックします。
- 「アクセス権」に移動し、 管理者 グループを選択します。
- [フル コントロール]オプションに対して [許可]を有効にします。
- [適用]ボタンをクリックし、[OK]をクリックします。
- レジストリ フォルダ 'cmd' に戻り、HideBasedOnVelocityId DWORD を右クリックします。
- [名前の変更] をクリックします。
- DWORD 名を [非表示に基づいて速度 Id] から [表示ベースオンベロシティ Id] に変更します。
- Enter キーを押します。
- エクスプローラを再起動します。
タスク バーの時計に秒を表示する
既定では、Windows 10 のタスク バーには時間と分のみが表示され、秒も表示する組み込みオプションは提供されません。さいわい、レジストリを変更し、Windows 10 のタスク バーの時計で数秒間サポートを有効にすることができます(以下を参照)。
タスク バーの時計に秒を表示するには、次の手順を実行します。
- Windows 検索を開きます。
- レジストリ エディタを検索し、クリックして開きます。
- Windows で、エディタの起動の許可を求める UAC が表示されたら、[はい]ボタンを押して続行します。
- HKEY_CURRENT_USER\ソフトウェア\マイクロソフト\ウィンドウ\現在のバージョン\エクスプローラ\詳細設定に移動します。
- 詳細または背景を右クリックし、[新規作成] > [DWORD (32 ビット) 値] を選択します。
- キーに名前を付けます " 表示秒インシステムクロック ".
- 値をダブルクリックし、1 に変更します。
- [OK] をクリックします。
- レジストリ エディタを閉じます。
- サインアウトして、変更を確認するためにサインアウトします。Windows を再起動することもできます。
Windows 10 で有効にする;詳細モード
レジストリを微調整すると、Windows 10 PCを「詳細モード」で起動し、問題のトラブルシューティング時に詳細情報と非常に役立つ情報を得ることができます。このモードでは、Windows 10 の起動とシャットダウン中にオペレーティング システムが実行している特定の手順が表示されます。
このモードでは、起動およびシャットダウンの問題のトラブルシューティングを行い、問題が発生したときに実行されている特定の手順を確認できます。
詳細モードは、Windows の重大な問題をトラブルシューティングする技術的な知識がある場合にのみ有効にする必要がある機能です。
「詳細」モードを有効にするには、次の手順に従ってください。
- Windows 検索を開きます。
- レジストリ エディタを検索し、クリックして開きます。
- Windows で、エディタの起動の許可を求める UAC が表示されたら、[はい]ボタンを押して続行します。
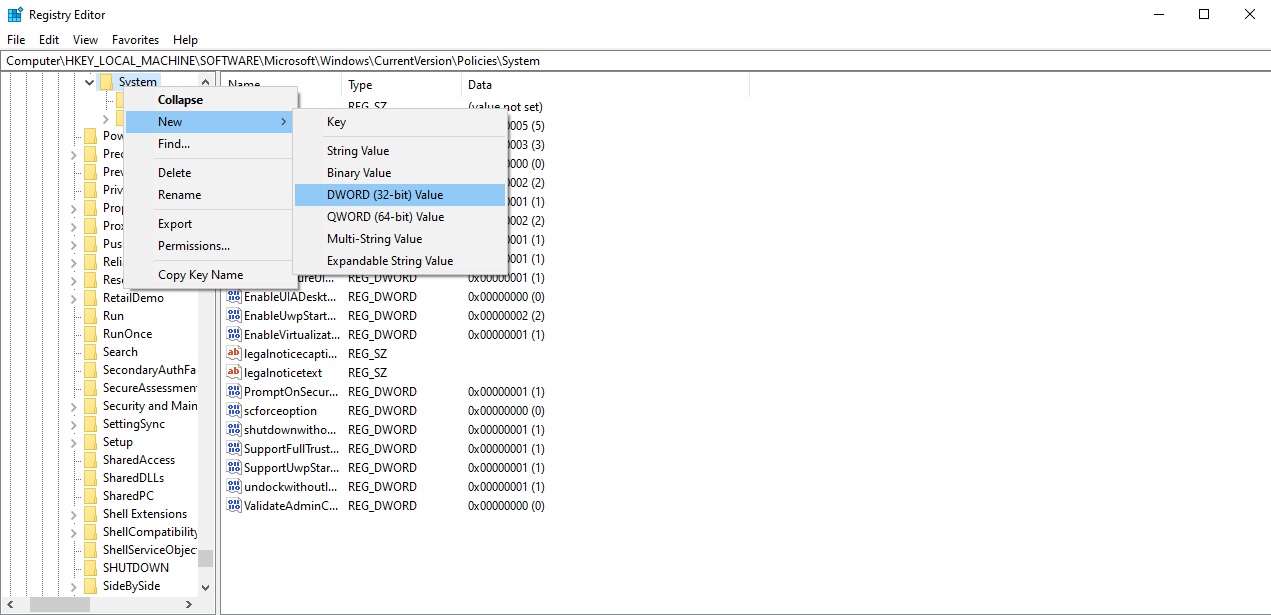
- HKEY_LOCAL_MACHINE\ソフトウェア\マイクロソフト\ウィンドウ\現在のバージョン\ポリシー\システムに移動します。
- [システム] フォルダを右クリックします。
- [新規] > [DWORD (32 ビット) 値] を選択します。
- 名前を付ける " 詳細ステータス "
- [詳細ステータス] をダブルクリックし、値を 1 に変更します。
- [OK] をクリックします。
- レジストリ エディタを閉じます。
- 再起動。
ーー以下原文ーー

Windows 10 is packed with useful settings that can improve your experience, but many features simply can't be accessed in Settings or Control Panel.
Using the Windows Registry editor, you can enable hidden features in Windows 10 that not only provide more information, but improve your experience in Windows 10.
It should be noted that the Registry Editor is a powerful tool, and it is recommended that you first create a backup of the registry before making any changes.
Doing so allows you to restore the backup and recover the system if you incorrectly edit or delete Registry entries.
Below are the highlighted registry hacks that you should know about to enhance your experience using Windows 10.
Disabling Bing Search in Windows Search
Windows Search comes with the Bing search engine integration, and it allows you to find the content on Bing when a local search fails to find anything.
If you don't like Bing due to privacy or performance issues or if it's causing problems, you can disable it via the Registry.
Please follow these steps to disable Bing Search in Windows 10:
- Open Windows Search.
- Search for Registry Editor and click to open it.
- When Windows will display a UAC asking your permission to launch the editor, simply press the Yes button to continue.
- In Registry Editor, navigate to the HKEY_CURRENT_USER\Software\Microsoft\Windows\CurrentVersion\Search key.
- Right-click on Search and select New > DWORD (32-bit) Value as shown below.
- Type BingSearchEnabled to create the new value.
- Double-click on BingSearchEnabled and set the value to 0 and press the OK button.
- Under the same location, locate CortanaConsent.
- Double-click on it and change the value to 0 and then press the OK button.
- Close the Registry Editor and restart Windows Explorer or restart Windows 10.
After making the above changes to the Registry, Windows 10 will now look for local search results such as documents, pictures, files, apps, or settings. If there are no local results, Windows will then display a blank page.
Disabling the Windows 10 lockscreen
The lock screen feature of Windows 10 could be unnecessary when you don't have a touch-enabled display. While there are several settings available in Windows 10 that you can modify to improve the lock screen experience, you can also remove it by editing your Registry.
To disable the Windows 10 lockscreen, follow these steps:
- Open Windows Search.
- Search for Registry Editor and click to open it.
- When Windows will display a UAC asking your permission to launch the editor, simply press the Yes button to continue.
- In Registry, double-click HKEY_LOCAL_MACHINE
- Navigate to \SOFTWARE\Policies\Microsoft\Windows
- Under the Windows folder, create a key called "Personalization."
- Right-click the new Personalization key you just created.
- Select New | DWORD (32-bit) Value.
- Enter NoLockScreen as the name.
- Double-click the entry and change the value to 1.
Once this key is created, the Windows 10 lock screen will be disabled.
Add 'Open command window here' to the File Explorer context menu
By tweaking your Registry, you can also restore the context menu option to open a Command Prompt window and have it open automatically in a specific folder, as shown below.
To add 'Open command window here' to the context menu, follow these steps:
- Open Windows Search.
- Search for Registry Editor and click to open it.
- When Windows will display a UAC asking your permission to launch the editor, simply press the Yes button to continue.
- Navigate to HKEY_CLASSES_ROOT\Directory\Background\shell\cmd
- Right-click the cmd (folder) key.
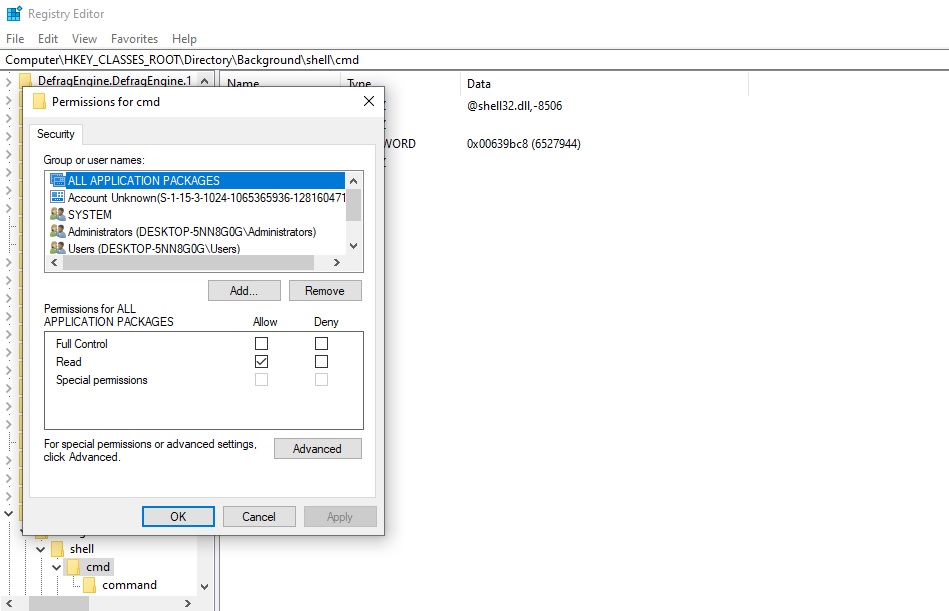
- Click Permissions and then click the Advanced button.
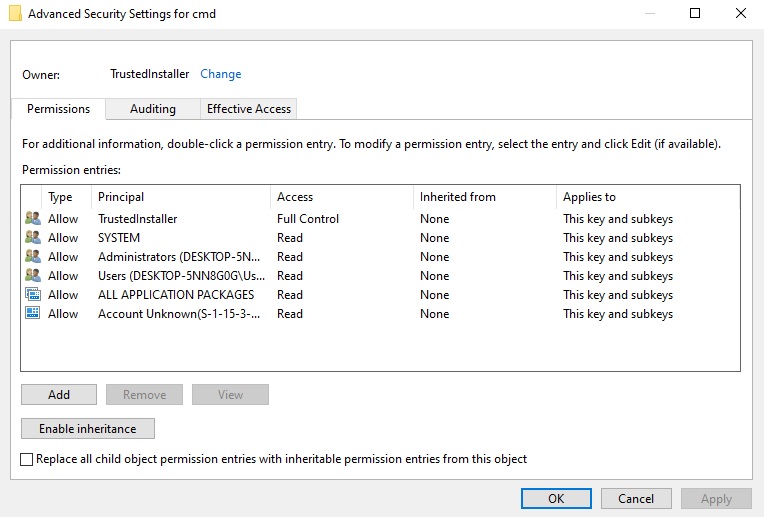
- On "Advanced Security Settings," select the Change link next to "TrustedInstaller" owner.
- Type your account name in the provided field.
- Click Check Names to verify your account name.
- Click OK.
- Check the Replace owner on subcontainers and objects option.
- Click the Apply button and click on OK.
- Navigate to "Permissions," select the Administrators group.
- Enable Allow for the Full Control option.
- Click the Apply button and click on OK.
- Navigate back to the Registry folder 'cmd' and right-click the HideBasedOnVelocityId DWORD.
- Click Rename.
- Change the DWORD name from HideBasedOnVelocityId to ShowBasedOnVelocityId.
- Press Enter.
- Restart Explorer.exe
Once you restart Explorer, if you hold Shift and right-click on a folder, you will now see the context menu named Open command window here.
Display seconds on the taskbar clock
By default, the taskbar of Windows 10 shows only the hour and minutes and does not provide a built-in option to also show the seconds.
Fortunately, you can modify your registry and enable support for seconds on Windows 10's taskbar clock, as shown below.

To display seconds on the taskbar clock, follow these steps:
- Open Windows Search.
- Search for Registry Editor and click to open it.
- When Windows will display a UAC asking your permission to launch the editor, simply press the Yes button to continue.
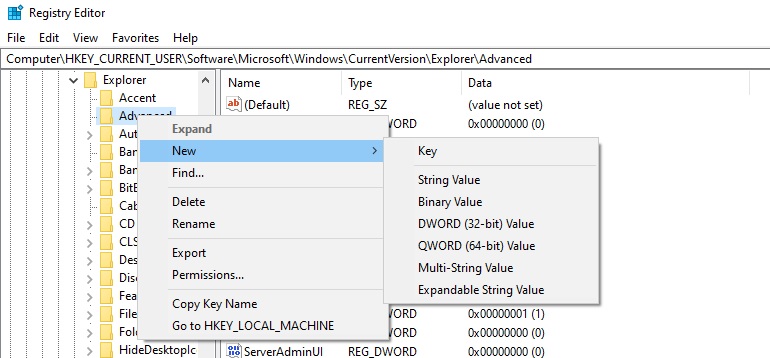
- Navigate to HKEY_CURRENT_USER\Software\Microsoft\Windows\CurrentVersion\Explorer\Advanced
- Right-click the advanced or its background and choose New > DWORD (32-bit) Value.
- Name the key “ShowSecondsInSystemClock”.
- Double-click the value and change it to 1.
- Click “OK.”
- Close Registry editor.
- Sign out and sign back to see the changes. You can also restart Windows.
Enable Verbose mode in Windows 10
With a tweak to the Registry, you can boot your Windows 10 PC into "Verbose mode" and get more detailed information and extremely helpful when troubleshooting problems.
This mode will display the specific step the operating system is on while booting up and shutting down Windows 10.
This mode allows you to troubleshoot startup and shutdown issues to see the specific steps are being performed when a problem occurs.

Verbose mode is a feature that you should enable only when you've technical knowledge to troubleshoot critical problems in Windows.
To enable 'Verbose' mode, please follow these steps:
- Open Windows Search.
- Search for Registry Editor and click to open it.
- When Windows will display a UAC asking your permission to launch the editor, simply press the Yes button to continue.
- Navigate to HKEY_LOCAL_MACHINE\SOFTWARE\Microsoft\Windows\CurrentVersion\Policies\System
- Right-click the System folder.
- Select New > DWORD (32-bit) Value.
- Name it "VerboseStatus".
- Double-click VerboseStatus and change its value to 1.
- Click OK.
- Close Registry editor.
- Reboot.
Once this setting is enabled, you will find both your shutdown and the boot-up process is more 'verbose' as it displays each step along the way.